Ready to indulge in a sweet treat that’s as easy to make as it is delicious? These Peanut Butter Chocolate Chip Blondies are your answer! Packed with creamy peanut butter and rich chocolate chips, they offer a delightful twist on classic dessert bars. I’ll guide you through each step, from gathering ingredients to perfecting your bake. So, put on your apron and let’s dive into the joy of baking these blondies!
Why I Love This Recipe
- Simple Ingredients: This recipe uses pantry staples like peanut butter and sugar, making it easy to whip up anytime.
- Deliciously Rich Flavor: The combination of peanut butter and chocolate creates a decadent treat that satisfies sweet cravings.
- Quick to Prepare: With only 15 minutes of prep time, you can have these blondies baking in no time.
- Customizable: Add your favorite mix-ins like crushed peanuts or different types of chocolate for a personal touch.
Ingredients
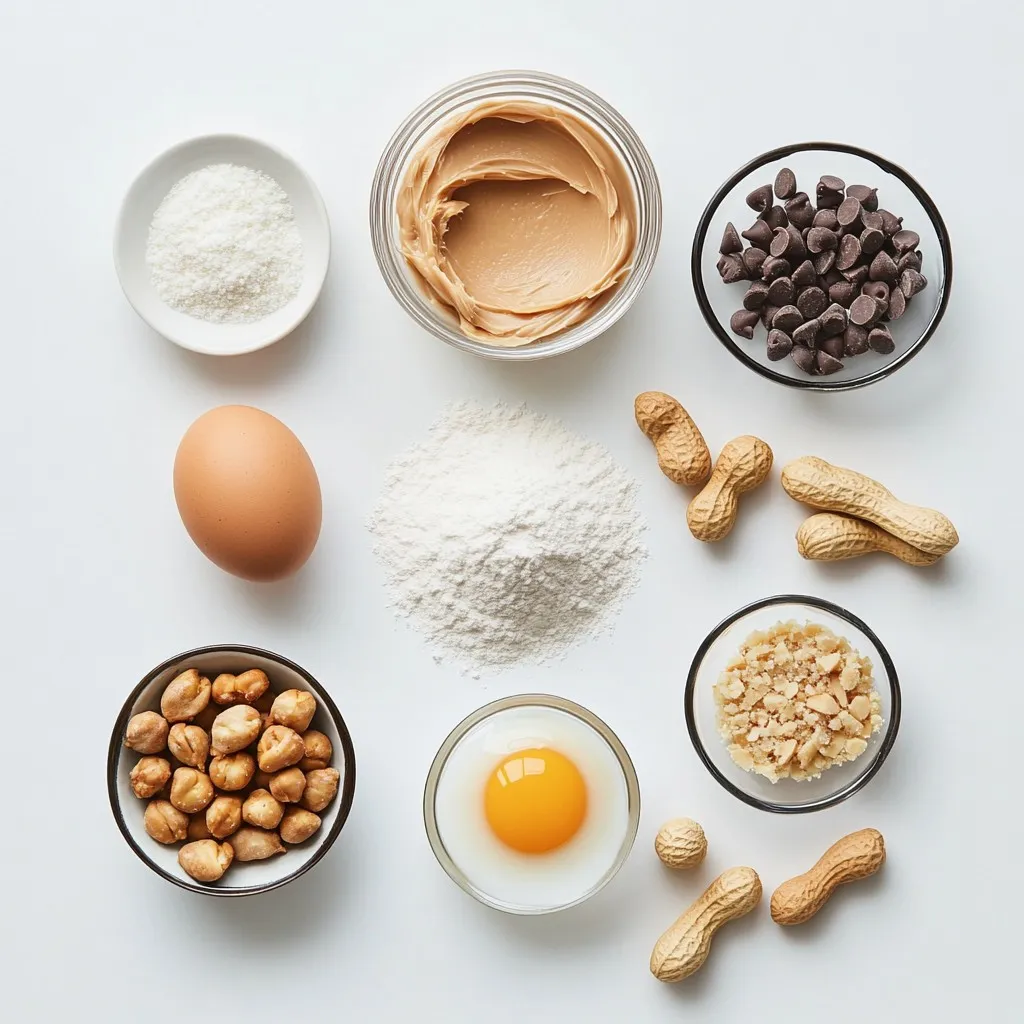
Comprehensive Ingredient List
To make these delicious peanut butter chocolate chip blondies, gather these key ingredients:
– 1 cup creamy peanut butter
– 1/2 cup brown sugar, packed
– 1/4 cup granulated sugar
– 1 large egg
– 1 teaspoon vanilla extract
– 1/4 teaspoon baking powder
– 1/4 teaspoon baking soda
– 1/4 teaspoon salt
– 1 cup all-purpose flour
– 1/2 cup chocolate chips (semi-sweet or dark)
– 1/4 cup crushed peanuts (optional, for added crunch)
Each ingredient plays a vital role. The peanut butter adds a rich and creamy base. The sugars create a lovely sweetness and a chewy texture. The egg binds everything, while the flour gives structure.
Optional Add-Ins
You can elevate your blondies even more with some fun add-ins:
– Types of chocolate chips: Semi-sweet chocolate chips offer a classic taste, while dark chocolate chips provide a richer flavor. Choose what you love best!
– Crushed peanuts: Adding crushed peanuts gives a nice crunch. They also enhance the peanut flavor and add a bit of texture.
Ingredient Substitutions
If you have dietary needs, here are some great swaps:
– Gluten-free flour alternatives: You can use almond flour or a gluten-free blend. This keeps your blondies tasty without gluten.
– Dairy-free options: For a dairy-free treat, use a dairy-free chocolate chip brand. You can also swap the egg for flaxseed or a chia seed mixture to keep it vegan.
Experimenting with these ingredients helps you create a blondie that suits your taste and dietary needs!
Step-by-Step Instructions
Prepping the Oven and Baking Pan
First, preheat your oven to 350°F (175°C). This step warms the oven for even baking. Next, prepare your 8×8-inch baking pan. You can grease it with a little oil or butter. Alternatively, line it with parchment paper. This makes it easy to lift the blondies out later.
Mixing the Wet Ingredients
In a large bowl, combine 1 cup of creamy peanut butter, 1/2 cup of brown sugar, and 1/4 cup of granulated sugar. Mix these until they are smooth and creamy. Then, add in 1 large egg and 1 teaspoon of vanilla extract. Stir until everything is mixed well.
Combining Dry Ingredients
In another bowl, whisk together 1 cup of all-purpose flour, 1/4 teaspoon of baking powder, 1/4 teaspoon of baking soda, and 1/4 teaspoon of salt. This helps to blend them evenly. When you mix the dry ingredients with the wet ones, do not overmix. You want it just combined, so it stays soft.
Baking the Blondies
Now, fold in 1/2 cup of chocolate chips and, if you like, 1/4 cup of crushed peanuts. Pour the batter into your prepared pan. Use a spatula to smooth it evenly. Bake in the oven for 20-25 minutes. Check for doneness by inserting a toothpick. It should come out clean or with a few crumbs.
Cooling and Serving Instructions
Once baked, let the blondies cool in the pan for about 15 minutes. This helps them set. Then, transfer them to a wire rack to cool completely. When they are cool, cut them into squares. They are now ready to serve and enjoy!
Tips & Tricks
Perfecting the Blondies
To achieve the right texture in your blondies, focus on mixing. You want a smooth batter but avoid overmixing. This can lead to tough blondies. Mix just until all ingredients blend together.
Another key is baking time. Check them early. The blondies should be golden at the edges. A toothpick inserted in the center should come out clean or with a few moist crumbs. If they bake too long, they may dry out.
Common baking mistakes often include not measuring ingredients correctly. Use measuring cups and spoons for accuracy. Also, make sure your oven is fully preheated before baking. This helps the blondies rise well.
Enhancing Flavor
You can boost flavor by adding spices. A dash of cinnamon or nutmeg can elevate your blondies. These spices mix well with peanut butter and chocolate.
Extracts also work great. Try adding a bit of almond extract. This adds a nice twist to the classic taste.
For toppings, consider drizzling melted chocolate or caramel sauce over the baked blondies. You can also sprinkle sea salt on top for a sweet and salty flavor that delights.
Tools and Equipment
Having the right tools makes baking easier. A good mixing bowl is essential. I recommend a large, sturdy one for mixing. You’ll also need a spatula for spreading the batter.
Use an 8×8-inch baking pan. This size helps the blondies bake evenly. Don’t forget parchment paper for easy removal.
A whisk is important for mixing dry ingredients. It helps break up clumps in the flour and baking powder. A toothpick is handy for checking doneness, too.
These tools make the process smooth and fun, helping you create the perfect peanut butter chocolate chip blondies!
Pro Tips
- Use Room Temperature Ingredients: Ensuring your peanut butter and egg are at room temperature helps the batter mix more smoothly, resulting in a better texture.
- Don’t Overmix: Mixing the batter just until combined prevents the blondies from becoming tough. A few lumps are okay!
- Check for Doneness: Oven temperatures can vary. Start checking your blondies at 20 minutes to avoid overbaking; they should be golden on the edges and slightly soft in the center.
- Add Extra Flavor: Consider mixing in a pinch of cinnamon or a splash of maple syrup for an added depth of flavor to your blondies.
Variations
Dietary Alternatives
You can easily adapt this recipe to fit your diet. For gluten-free blondies, use gluten-free flour. This swap keeps the texture just right. It’s a simple fix for those avoiding gluten.
If you want vegan options, swap the egg for flaxseed meal. Mix one tablespoon of flaxseed with three tablespoons of water. Let it sit for a few minutes to thicken. This mix works great and keeps the blondies moist.
Flavor Additions
Feel free to explore different nut butters. Almond or cashew butter can add unique flavors. Each nut butter brings its own twist to the taste. You can even mix them for a fun blend.
Other mix-ins can elevate your blondies too. Consider adding chopped nuts like walnuts or pecans. Dried fruit like cranberries or raisins gives a sweet touch. You can also try different types of chocolate chips for more variety.
Seasonal Twists
Get creative with seasonal themes! For holidays, add spices like cinnamon or nutmeg. These spices warm up the flavors and make them festive. You can also decorate them with icing or colored sprinkles.
In the summer, think about fresh fruits. You can fold in blueberries or raspberries. These fruits add brightness and a refreshing taste. Each season offers a chance for new fun flavors in your blondies!
Storage Info
Best Practices for Storing Blondies
To keep your peanut butter chocolate chip blondies fresh, store them in an airtight container. This helps prevent them from drying out. You can keep them at room temperature for up to three days. If you live in a warm area, consider refrigeration. Just remember, cold blondies may lose some taste.
– Airtight Container: Use one that seals well. This keeps moisture in and air out.
– Room Temperature: Ideal for short-term storage. They stay soft and chewy.
– Refrigeration: Helps them last longer, but can change the texture.
Freezing Blondies
Freezing blondies is easy. First, let them cool completely. Then, cut them into squares. Wrap each square tightly in plastic wrap. Place the wrapped blondies in a freezer-safe bag. Make sure to remove as much air as possible. This helps avoid freezer burn.
– Steps for Freezing:
1. Cool completely.
2. Cut into squares.
3. Wrap in plastic wrap.
4. Place in a freezer bag.
To thaw, take out the desired number of blondies. Leave them in the fridge overnight or on the counter for a few hours. They will taste fresh again!
Shelf Life
Properly stored, blondies stay fresh for about a week at room temperature. In the fridge, they can last up to two weeks. If you freeze them, they can last up to three months.
– Signs of Spoilage:
– Dry texture: If they feel hard, they are past their prime.
– Off smell: A sour or unusual smell means they are no longer good.
– Mold: If you see any mold, throw them away immediately.
Following these tips helps ensure that your blondies stay delicious for as long as possible. Enjoy every bite!
FAQs
How do I know when the blondies are done baking?
To check if the blondies are done, use a toothpick. Stick it into the center of the blondies. If it comes out clean or with a few moist crumbs, they are ready. The edges should be golden brown. If the toothpick has wet batter, bake for a few more minutes. Keep an eye on them, as overbaking can make them dry.
Can I substitute the peanut butter with almond or cashew butter?
Yes, you can use almond or cashew butter instead of peanut butter. The taste and texture will change slightly. Almond butter gives a nuttier flavor, while cashew butter is creamier. Both will still work well in the recipe. Your blondies will still be delicious, just with a new twist!
What is the difference between blondies and brownies?
Blondies and brownies differ mainly in flavor and texture. Brownies have cocoa powder, giving them a rich chocolate flavor. Blondies are made with brown sugar and peanut butter, which gives them a sweet, caramel-like taste. Blondies are often denser and chewier than brownies. Both are yummy, but they offer different treats!
How can I make these blondies healthier?
To make these blondies healthier, you can reduce the sugar. Try using less brown sugar or granulated sugar. You can also swap all-purpose flour for whole wheat flour. This increases fiber and nutrients. Another option is to use natural peanut butter without added sugar. These changes will keep your blondies tasty and a bit better for you!
In summary, this guide covers all you need for making delicious blondies. You learned about the key ingredients, optional add-ins, and how to customize for dietary needs. I shared clear steps from prepping to serving, plus tips for perfect texture and flavor. Remember, you can adapt these blondies for any season or occasion. Enjoy experimenting and sharing your treats. Happy bakin